In Volume Spread Analysis (VSA), the Climactic Action Bar (CAB) is one of the most powerful signs of institutional intervention you can trade. When a market is falling, retail traders often panic-sell into the drop. Meanwhile, institutional “Smart Money” steps in with massive order volume to absorb that selling pressure, creating a Selling Climax.
While a Selling Climax signals that a reversal is brewing, never take an immediate trade on the climax candle itself. Doing so exposes you to high risk.
In this guide, we will break down the 4 strict conditions of a valid Selling Climax, how to mark your Trigger Lines, and how to trade Scenario 1 and Scenario 2 for maximum accuracy.
The 4 Strict Conditions of a Selling Climax
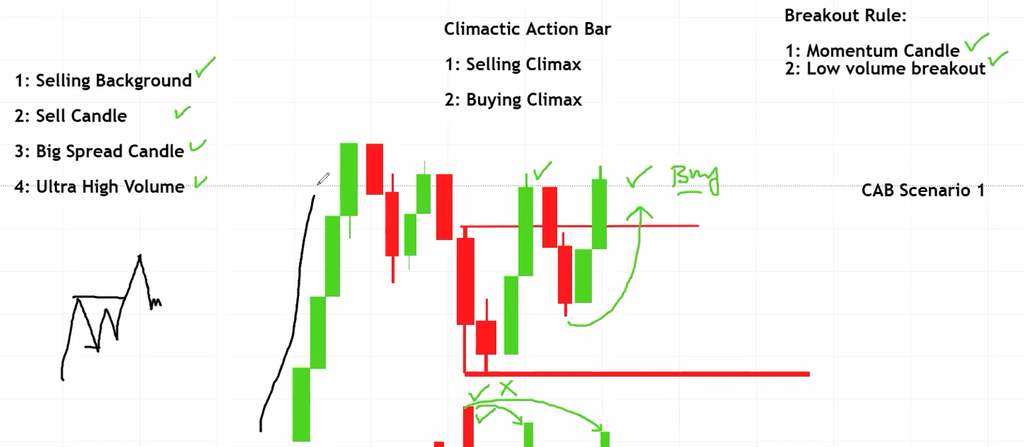
To identify a high-probability Selling Climax, the candle must satisfy four strict rules:
1. Selling Background
A true Selling Climax requires a valid bearish background. This background begins when the low wick of the last independent buy candle is broken downward by sell candles.
What is an independent buy candle? It is a bullish candle whose upper wick has not been closed above by any subsequent buy candles in that immediate structure.
2. A Sell Candle
The climax bar must be a down-closing (red) candle.
3. A Big Spread Candle
The candle must have a wide price range (from the tip of the upper wick to the tip of the lower wick). If you are unsure which sell candle has the largest spread, look at the volume to resolve the ambiguity.
4. Ultra-High Volume
The volume bar must be Ultra-High compared to recent wave activity (the tallest peak relative to the last 200–250 candles).
The Volume Progression Rule: If subsequent sell candles continue to form with even higher volume, the latest sell candle with the highest volume becomes your new Selling Climax candle.
Location Confluence: A CAB yields the best results when it forms directly at a major Point of Interest (POI), such as a higher-timeframe Order Block or Demand Zone.
Setting Up Your Trigger Lines
Once a valid Selling Climax candle is identified, draw two horizontal lines across its range:
- Upper Trigger Line: Placed on the top tip of the upper wick (or the candle body if there is no upper wick).
- Lower Trigger Line: Placed on the bottom tip of the lower wick (or the candle body if there is no lower wick).
These trigger lines serve as your boundaries to evaluate price action and volume before taking an entry.
Breakout Rules (Mandatory for All Scenarios)
Before looking at specific scenarios, any candle that causes a breakout of the Upper Trigger Line must meet these strict criteria:
- Momentum Candle Structure: It must be a strong bullish bar with no long upper wick. The upper wick size must not exceed 15% of the total candle body.
- Volume Check: The breakout candle’s volume MUST be lower than the volume of the original CAB candle. If the breakout volume is higher than the CAB volume, cancel the trade setup immediately.
Scenario 1: The Touch & Double Breakout Setup
In Scenario 1, price retraces into the CAB candle, touches the Lower Trigger Line without breaking it, and then breaks out to the upside.
How It Unfolds:
- The Touch: Subsequent candles pull back inside the CAB zone and merely touch or test the Lower Trigger Line. The Lower Trigger Line must not be broken downward.
- First Breakout (Do Not Buy): Price pushes up and breaks out above the Upper Trigger Line. Buying on this first breakout is risky.
- The Pullback: Wait for price to pull back inside the CAB candle range once again. During this retest, price will either sweep the Lower Trigger Line or simply hold inside the body.
- Second Breakout (Your Entry): Enter long on the second valid breakout above the Upper Trigger Line.
                  [ Second Breakout -> ENTRY ]
                            /
      [ First Breakout ]   /
             /   \        /
            /     \------/  (Pullback inside CAB)
  ═════════/════════════════════════ Upper Trigger Line
          /
         /  (Touch only - No breakdown)
  ══════/═══════════════════════════ Lower Trigger Line
       [ CAB Bar ]
Trade Execution:
- Entry: Market or stop order on the closure of the second Upper Trigger Line breakout candle.
- Stop Loss (SL): Placed safely below the Lower Trigger Line.
- Take Profit (TP): Target the recent structural High. For a risk-free baseline, scale out or set TP at a 1:1 Risk-to-Reward Ratio.
Scenario 2: The Liquidity Sweep Setup
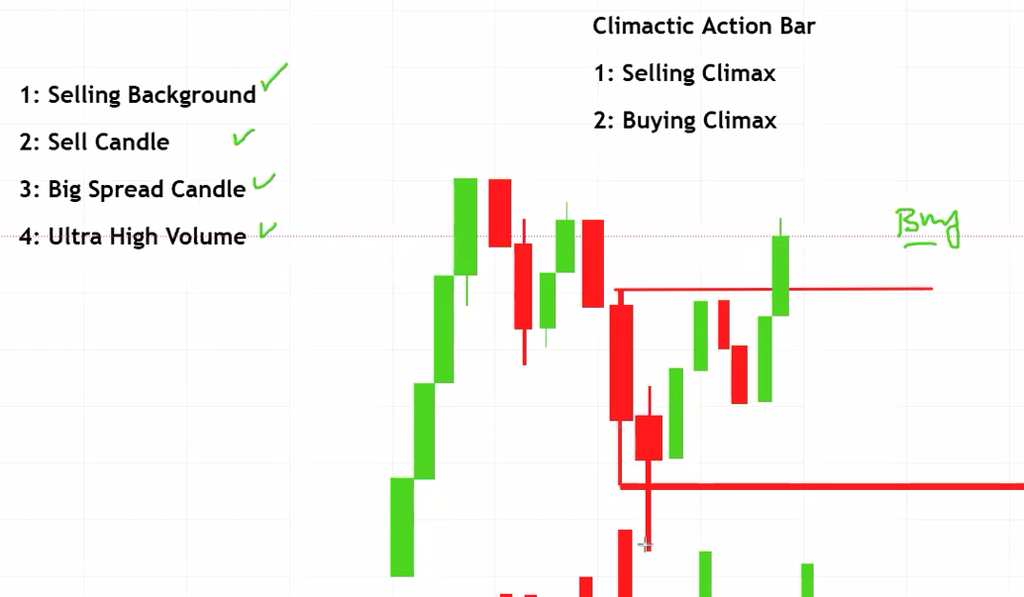
In Scenario 2, Smart Money aggressively drives price below the CAB to sweep sell-stop liquidity before reversing hard.
How It Unfolds:
- The Lower Sweep: Subsequent price action pushes below the Lower Trigger Line, but only wicks below it.
- Crucial Rule: The candle must NOT close below the Lower Trigger Line. If a candle closes below the line, Scenario 2 is invalidated.
- Immediate or Ranging Breakout: After the sweep, price will either immediately rocket upward or consolidate briefly before breaking out above the Upper Trigger Line.
- Direct Entry: Unlike Scenario 1, you do NOT wait for a second breakout in Scenario 2. The liquidity sweep itself provides the necessary institutional confirmation.
               [ First Breakout -> DIRECT ENTRY ]
                         /
                        /
  ═════════════════════/════════════ Upper Trigger Line
                      /
  ═══════════════════/══════════════ Lower Trigger Line
          \         /
           \_______/  <-- (Wick Sweep below Lower Line; No Candle Close Below)
          [ CAB Bar ]
Trade Execution:
- Entry: Buy immediately upon the first valid breakout above the Upper Trigger Line.
- Stop Loss (SL): Placed just below the lowest point of the sweep wick (below the Lower Trigger Line).
- Take Profit (TP): Target the nearest structural High (or lock in risk-free at 1:1 R:R).
Summary Comparison
| Feature | Scenario 1 | Scenario 2 |
| Lower Line Action | Touched only (No sweep/break) | Swept by a wick (No candle close below) |
| Breakout Entry | Wait for the 2nd Breakout | Enter on the 1st Breakout |
| Breakout Volume | Must be lower than CAB volume | Must be lower than CAB volume |
| Stop Loss Location | Below the Lower Trigger Line | Below the tip of the sweep wick |