In our previous Smart Money Concepts (SMC) guide, we covered how an Imbalance / Fair Value Gap (FVG) represents a one-sided move where price leaves behind unmitigated orders.
While a standard FVG is a powerful area for price retests, there is an even higher-probability level created when two opposing FVGs overlap: the Balanced Price Range (BPR).
In this guide, we will break down what a Balanced Price Range is, the strict rules required to validate it, and how to use it for high-precision entries.
1. What is a Balanced Price Range (BPR)?
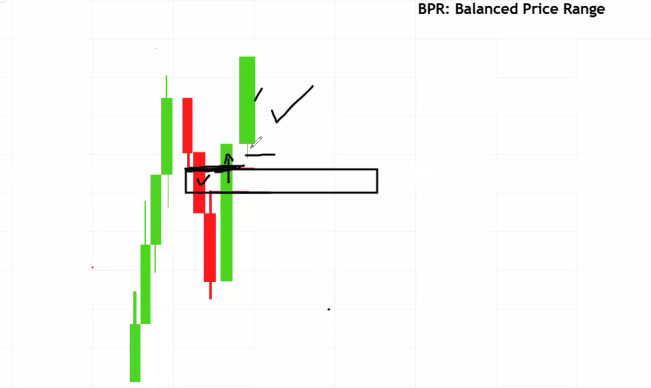
A Balanced Price Range (BPR) occurs when a Buy FVG (bullish imbalance) directly overlaps with a Sell FVG (bearish imbalance).
How It Forms:
- The First Move (Sell FVG): Price drops aggressively in one direction, leaving behind a bearish Fair Value Gap.
- The Immediate Reversal (Buy FVG): Price immediately reverses aggressively upward, slicing right through the previous bearish gap and leaving behind a new bullish Fair Value Gap in the exact same region.
- The Overlap (BPR Zone): The common area where both the bearish FVG and the bullish FVG overlap is your Balanced Price Range.
Because price moved violently down and then violently back up through the same area, it has created a unique double-imbalance zone that acts as extremely strong support or resistance once retested.
2. Key Rules for a Valid BPR
Not every overlapping gap creates a strong BPR. You must enforce these strict conditions:
Rule 1: Structural Break Requirement (Crucial)
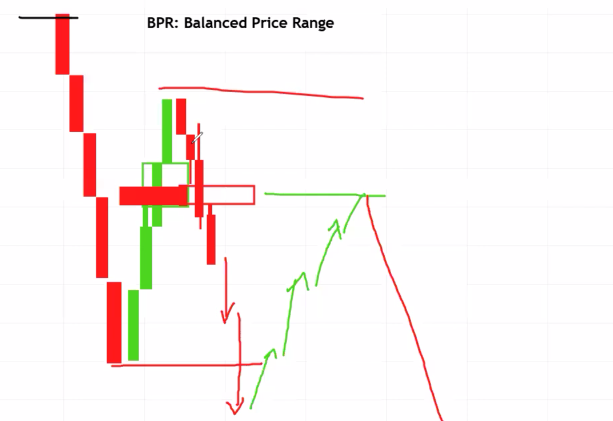
An FVG—and by extension a BPR—is only truly valid if the move originating from it successfully breaks market structure (BOS). Always prioritize BPRs that result in a confirmed break of a previous High or Low.
Rule 2: Middle Candle Positioning
For a bullish BPR setup, the middle candle (Candle 2) of the front/bullish FVG must extend and close above the overlapping zone. This proves that aggressive buying momentum completely dominated and overcame the previous sell imbalance.
Rule 3: The Strong Engulfing Variation
If the first candle of the front FVG is a very strong, aggressive engulfing candle, that first candle itself can also be included in defining the front FVG boundaries. This expands the overlapping BPR zone to cover the full strength of the institutional reaction.
3. How to Mark and Trade a BPR Step-by-Step
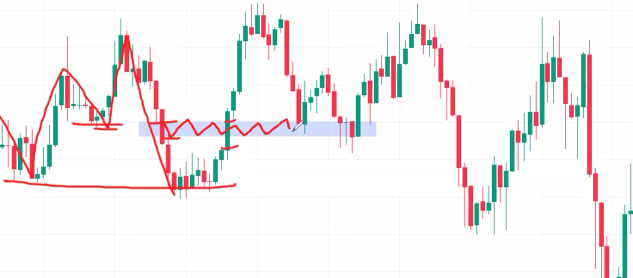
When price returns to a BPR, it treats the overlapping region as a heavily defended institutional zone.
- Identify the Bearish FVG: Locate the initial drop that left an unmitigated sell gap between Candle 1’s low wick and Candle 3’s high wick.
- Identify the Bullish FVG: Locate the sharp upward move that sliced right back through that sell gap, leaving a bullish gap between its Candle 1’s high wick and Candle 3’s low wick.
- Draw the BPR Rectangle: Highlight only the common overlapping area between both gaps.
- Confirm BOS: Ensure the upward expansion broke previous structural highs.
- Execution: Place your buy limit inside the BPR zone or wait for a Volume Spread Analysis (VSA) / lower-timeframe confirmation (like stopping volume or a 15-minute CHOCH) as price retests the BPR.
- Stop Loss: Place your stop loss safely below the low of the impulse structure that created the BPR.
Summary Checklist
- Find the Overlap: Look for a bullish FVG trading directly through a previous bearish FVG (or vice versa).
- Demand Structure Breaks: Ensure the move breaks previous market structure (BOS) to confirm institutional backing.
- Mark the Common Area: Draw your BPR box strictly on the overlapping price range.
- Trade the Retest: Enter when price returns to test the BPR zone, targeting higher structural highs.