In Smart Money Concepts (SMC) and Institutional Trading, an Order Block (OB) is one of the most powerful concepts you can master. An Order Block represents a specific price zone where institutional market participants—like banks and hedge funds—have placed massive buy or sell orders.
However, many beginner traders make the mistake of marking every single opposite-colored candle as an Order Block. This leads to cluttered charts, frequent stop-outs, and confusion.
In this guide, we will break down what makes an Order Block valid, how to locate your primary Points of Interest (POIs), and how to combine SMC with Volume Spread Analysis (VSA) for high-probability entries.
1. Locating Your Points of Interest (POIs)
Before marking an Order Block, you must locate your Points of Interest (POIs)—the specific structural areas where you expect the market to react.
In a bullish trend, there are two primary POIs:
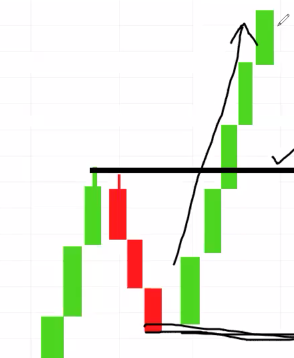
POI #1: The Break of Structure (BOS) Level
- Location: The previous Higher High (HH) that price just broke through.
- Characteristics: When price breaks a high, it often returns to retest the broken structure level (flip zone from resistance to support).
POI #2: The Impulse Origin (The Confirmed Higher Low)
- Location: The exact point where the latest strong impulse wave started.
- Characteristics: This is a much stronger and more reliable POI than POI #1. Because this level represents the confirmed Higher Low (HL) that pushed price to a new high, institutional interest is heavily concentrated at its origin.
2. What Makes a Valid Bullish Order Block?
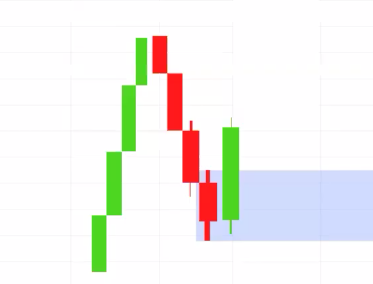
A bullish Order Block is fundamentally defined as the last bearish (red) candle before a strong bullish (green) move. However, for that candle to be considered a valid, high-probability Order Block, it must meet strict price action conditions.
The 3 Rules for a Valid Order Block:
- The Engulfing Condition:
- Price must reverse off the low with a strong bullish (green) candle that completely engulfs the prior sell (red) candle.
- It can engulf a single red candle or a cluster of multiple smaller red candles.
- Wick & Body Dynamics:
- Higher Importance (Liquidity Sweep): If the engulfing green candle’s lower wick dips below the lowest wick of the red candle, it indicates a liquidity sweep of sell-stops before moving up—making the OB significantly stronger.
- Clean Momentum: The engulfing green candle should ideally have little to no upper wick, showing aggressive, unmitigated buying pressure.
- The Validation Trigger (Structural Break):
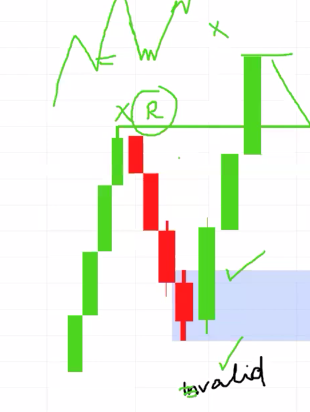
- Drawing a box around the engulfed red candle makes it an unconfirmed Order Block.
- It becomes validated ONLY AFTER the move originating from this zone successfully breaks the previous market structure (e.g., creates a confirmed Higher High).
[Last Red Candle] ──► [Engulfing Green Candle] ──► [Price Breaks Structure (BOS)] ──► OB Validated!
3. How to Draw the Order Block Box
Drawing your Order Block box accurately ensures your entry and risk management are tight:
- Locate the last red candle prior to the strong bullish expansion.
- Draw a rectangle covering the entire range of that last red candle—from the top tip of its upper wick down to the bottom tip of its lower wick.
- Extend the rectangle horizontally to the right into future price action.
4. Aggressive SMC Entries vs. VSA Confirmations
There are two ways traders approach Order Blocks:
The Aggressive SMC / ICT Approach
Many ICT and SMC traders place blind limit orders directly at the top or 50% equilibrium level of the Order Block zone as soon as it is marked.
While this approach works when momentum is strong, it carries risk because price can sometimes slice through an Order Block if higher timeframe market conditions are unfavorable.
The Smart VSA Approach (Recommended)
Instead of placing blind limit orders, wait for Volume Spread Analysis (VSA) confirmations inside the Order Block zone:
- Wait for price to enter your marked Order Block box.
- Look for stopping volume, climactic action bars, or a low-volume retest inside the box.
- Once low-volume exhaustion or a 15-minute Momentum Shift (CHOCH) appears inside the OB, trigger your trade with confirmation.
[INSERT IMAGE HERE: Price returning to the Order Block with low-volume VSA confirmation]
5. Why Order Blocks Fail (Higher Timeframe Context)
Even a perfectly drawn Order Block can fail if you ignore the bigger picture.
The Higher Timeframe Overrule: If you are looking at a 15-minute bullish Order Block, but price is running straight into a strong 4-Hour (H4) or Daily (D1) Rejection / Resistance Zone, the lower timeframe Order Block is at high risk of failing.
Always align your Order Blocks with higher timeframe trends and key rejection zones. However, even when an Order Block ultimately fails due to macro resistance, a valid OB will almost always produce at least a minor bounce or short-term reaction that you can manage safely.
Summary Checklist
- Locate the True Origin: Prioritize POI #2 (the origin of the impulse wave / confirmed HL) over simple structure retests.
- Verify the Engulfing Rule: Ensure the last red candle is fully engulfed by a strong green candle, preferably sweeping lower wicks.
- Require a BOS: Do not treat an Order Block as valid until price breaks the previous structural high.
- Confirm with VSA: Avoid placing blind limit orders; wait for low volume or stopping volume inside the zone.
- Check HTF Zones: Ensure you are not buying directly into a 4H or Daily major resistance area.